

Chargement d'une batterie LiFePO4 : Guide étape par étape
I see packs come back to our QC bench for one simple reason: the charger was set like lead-acid. That mistake causes weak runtime, nuisance BMS trips, or stressed cells.
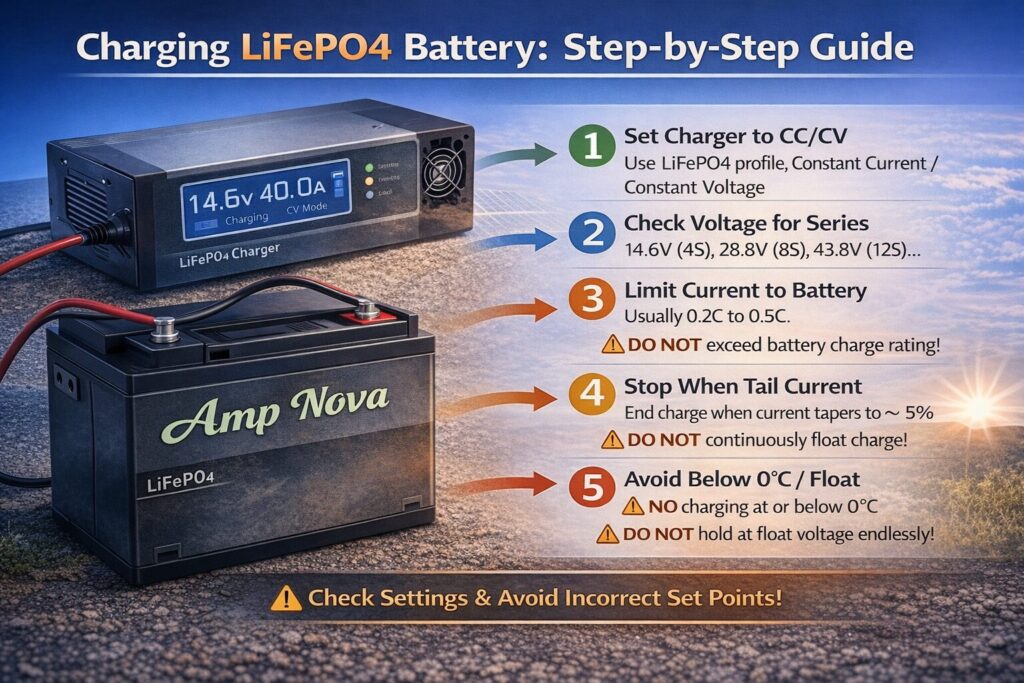
To charge a LiFePO4 battery safely, use a LiFePO4 CC/CV profile, set the correct voltage for your series cell count, limit charge current to the battery rating, and stop when current tapers to a small tail. Avoid charging at or below 0°C, and avoid continuous float charging.
In this guide, I’ll show the exact settings to check, what to avoid, and a practical step-by-step process you can follow on real solar, RV, marine, and backup power systems.
Understanding LiFePO4 Charging Basics (CC/CV Explained)
On our test rack, the fastest way to spot a wrong setup is the current curve. LiFePO4 wants stable current, then a clean taper, not endless “float”.
LiFePO4 charging is usually CC/CV: the charger supplies constant current (CC) until the pack reaches the set voltage, then holds constant voltage (CV) while current tapers down. A LiFePO4 pack is considered “full” when the CV current drops to a small tail current, not merely when the target voltage is reached.
Why LiFePO4 charging feels “different” than lead-acid
LiFePO4 has a flatter voltage curve through most of its state of charge. That means:
- Voltage alone is a poor “fuel gauge” in the middle.
- A lead-acid charger’s multi-stage logic (bulk/absorb/float, sometimes equalize) can be a bad match.
- Traditional float behavior is often unnecessary for LiFePO4 and can add extra time at high voltage.
Lead-acid profiles can also include “equalize” or “desulfation” pulses. Those stages are not designed for LiFePO4. In the field, that shows up as BMS cutoffs, heat, and packs that never seem to behave consistently.
CC then CV, and why “tail current” matters
Think of CC/CV like filling a bucket:
- CC stage: You pour at a constant rate (amps). Battery voltage rises.
- CV stage: You hold the water level at a fixed height (voltage). The pour rate naturally slows (amps taper).
LiFePO4 is “full” when the current in CV drops to a small value. A common practical rule is tail current around ~5% of capacity (example: a 100Ah pack is “full” when CV current drops to ~5A), but you should always follow the battery maker’s spec if it differs.
This matters because:
- If you stop the moment voltage hits the setpoint, you can stop early.
- If you keep pushing high voltage with no termination rule, you waste time and can stress the pack.
What device is actually in control?
In solar and hybrid systems, the “charger” might be:
- A standalone AC charger
- An inverter/charger
- An MPPT charge controller
- A DC-DC charger from an alternator
You only get one real boss. If multiple devices try to regulate voltage, you can get hunting, early termination, or repeated restarts. Pick one primary charging source at a time, or coordinate settings so they agree.
Quick reference: CC/CV stages and what to set
| Stage | What happens | What you set | When to stop |
|---|---|---|---|
| CC (constant current) | Current stays near limit; voltage climbs | Max charge current (A) | When pack reaches absorption voltage |
| CV (constant voltage) | Voltage held constant; current tapers | Absorption/CV voltage (V) | When current falls to tail current or timer ends |
| Rest (optional) | Charger stops; pack relaxes | None | Use restart threshold if needed |
| Float (generally avoid) | Holds pack at a fixed voltage | Low float or disabled | If required, keep low and not continuous |
Choosing the Right LiFePO4 Charger (What to Avoid)
In our production line audits, most “mystery problems” trace back to one purchase decision: a charger that cannot be programmed correctly, so people force a lead-acid profile.
Choose a LiFePO4-specific charger or a programmable inverter/MPPT profile that supports CC/CV and lets you set voltage and current precisely. Avoid lead-acid-only chargers, equalize/desulfation modes, and high float voltages, because they can undercharge the pack, trigger BMS protection, or keep the battery stressed at high voltage.
Must-have features for a LiFePO4 charger
Look for:
- LiFePO4/Lithium profile or fully programmable CC/CV settings
- Adjustable current limit (or multiple current modes)
- Clear termination behavior (tail current, timer, or both)
- Temperature awareness (battery temp sensor input is ideal)
- Safety protections: reverse polarity, short-circuit, over-temp
- Electrical compliance appropriate for your region (always check local codes/regs for installation and wiring requirements)
If you use an inverter/charger or MPPT, confirm it supports a lithium profile where you can set:
- Bulk/absorption (CV) voltage
- Absorption time (or current-based termination)
- Float voltage (ideally off or very low)
- Restart/rebulk thresholds
What to avoid (this list saves batteries)
Avoid chargers that:
- Only have plomb-acide presets (AGM/GEL/Flooded) with no true lithium tuning
- Include equalize or desulfation that cannot be disabled
- Force a high float stage indefinitely
- Have no way to limit current (dangerous on small packs and hard on alternators)
- Have vague specs like “12V lithium” but no voltage control
Charging from a vehicle alternator: use DC-DC, not a simple isolator
Alternators are not battery chargers. When you connect a large LiFePO4 bank through an isolator, the battery can demand high current for a long time. That can:
- Overheat the alternator (sustained high output)
- Create unstable voltage regulation
- Trip the battery BMS (overcurrent or overvoltage)
UN DC-DC charger solves this by enforcing:
- A maximum current draw from the alternator
- A proper CC/CV lithium profile
- Often, ignition control and temperature protections
If you design mobile systems, treat DC-DC as standard practice, not a luxury add-on.
When you should care about remote voltage sense
Some better chargers support remote voltage sensing. That means the charger measures voltage at the battery terminals, not at the charger’s output studs. This matters because cable voltage drop can “lie” to the charger.
If your cables are long or current is high, remote sense can be the difference between:
- A true full charge and a chronic undercharge
- A stable CV taper and a never-ending absorb stage
Inrush and why big banks need a gentle connection
Large inverters and chargers often have big input capacitors. When you connect a LiFePO4 bank, those caps can pull a brief but massive inrush current that causes:
- Connector arcing
- Nuisance BMS trips
- Blown fuses
UN pre-charge resistor or soft-start path reduces the shock. If your system is 24V/48V and high-power, plan for inrush control from day one.
Setting Correct Charging Voltage and Current (12V/24V/48V)
On our cell grading bench, the fastest way to create imbalance is mismatched voltage targets. If the series count is wrong, every other setting becomes wrong too.
Set LiFePO4 charge voltage by series cell count, typically around 3.60–3.65V per cell for absorption/CV. Limit charge current to the battery’s specification (often about 0.3–1.0C), and treat “full” as the point where CV current tapers to a small tail current. Avoid traditional float; if required, use a low hold voltage or restart threshold.
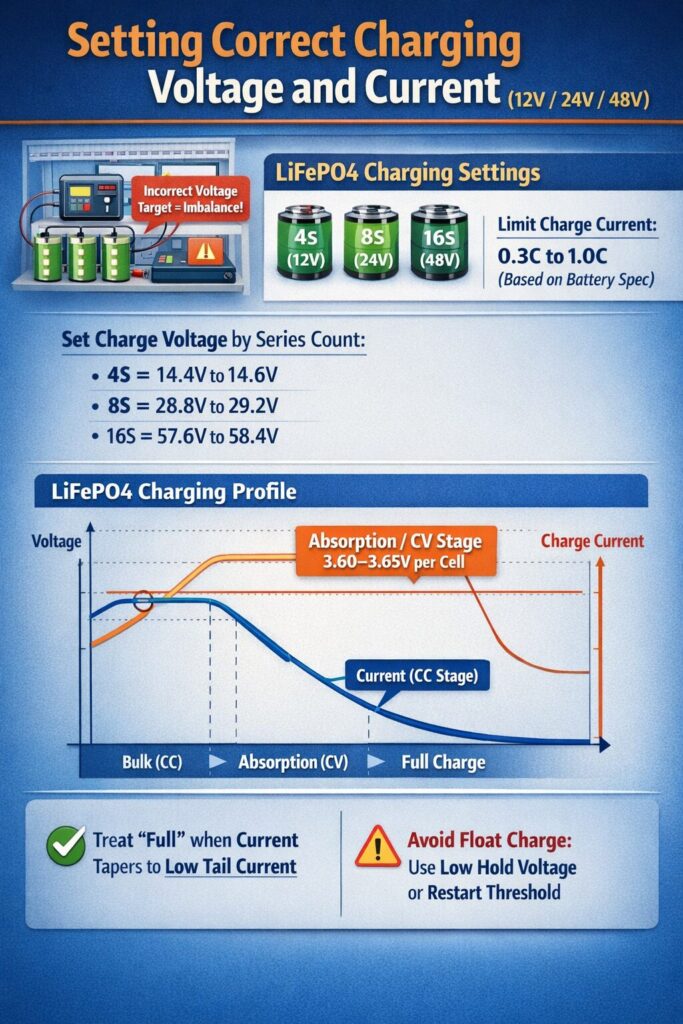
Step 1: Confirm the pack series count (S)
Common “system voltages” are really shorthand for series cell count:
- “12V LiFePO4” is usually 4S (4 cells in series)
- “24V LiFePO4” is usually 8S
- “48V LiFePO4” is usually 16S
Do not assume. Verify the label, datasheet, or BMS configuration. A “12V” pack that is actually 8S (rare, but not impossible in custom builds) will not charge correctly on 14.6V.
Step 2: Set absorption/CV voltage using per-cell guidance
A practical typical range is:
- Absorption/CV: ~3.60–3.65V per cell
- Low float / hold (if you must): ~3.40V per cell or disable float
- Daily charge cap: often 80–90% SOC by slightly reducing absorption voltage or stopping early
Here are typical pack-level examples:
| System label | Cells in series | Absorption/CV (typical) | Daily-cap target (often 80–90% SOC)* | Low float / restart hold (if required) |
|---|---|---|---|---|
| 12V LiFePO4 | 4S | ~14.4–14.6V | ~13.8–14.2V | ~13.6V (or float off) |
| 24V LiFePO4 | 8S | ~28.8–29.2V | ~27.6–28.4V | ~27.2V (or float off) |
| 48V LiFePO4 | 16S | ~57.6–58.4V | ~55.2–56.8V | ~54.4V (or float off) |
*Daily-cap values are general guidance. Different cell vendors and BMS limits can shift the “best” voltage. Use the battery manufacturer’s recommended settings when available.
Step 3: Set charge current using C-rate (and your system reality)
C-rate converts battery capacity to current:
- Charge current (A) = Capacity (Ah) × C-rate
Examples:
- 100Ah at 0.5C = 50A
- 280Ah at 0.3C = 84A
- 200Ah at 1.0C = 200A (only if the battery is rated for it and the wiring/protection supports it)
Many LiFePO4 batteries support something in the 0.3–1.0C range, but you must follow the pack’s rating, because:
- BMS overcurrent limits vary
- Thermal design varies
- Small “drop-in” packs often have lower continuous limits than big rack modules
Also check system constraints:
- Cable ampacity
- Fuse/breaker ratings
- Charger output rating
- Alternator safe draw (for mobile)
Step 4: Terminate the charge by tail current, not only by voltage
A clean rule that works in practice:
- Hold CV at absorption voltage
- Stop when current drops to a tail current (example: ~0.05C, or 5% of capacity)
- Or stop based on a safe absorb timer if your charger cannot terminate by tail current
Why this prevents headaches:
- It avoids “false full” when voltage is reached briefly.
- It reduces time spent forcing a high voltage when the battery is already essentially full.
- It supports BMS balancing, because balancing often happens near the top.
Step 5: Avoid continuous float (and what to do if your device forces it)
LiFePO4 does not need a classic lead-acid float. If your charger requires a float setting:
- Set it low (around 3.40V/cell, e.g., 13.6V for 4S)
- Or treat float as a restart threshold concept (stop charging, restart if voltage falls)
If your inverter/charger insists on constant float at a high voltage, consider changing equipment or using a different charging mode, because that design assumption is lead-acid thinking.
Charging Temperature Guidelines (Cold-Weather Charging Tips)
In our failure analysis photos, cold-charge damage looks boring at first and expensive later. The pack “works,” but capacity and internal resistance drift the wrong way.
Never charge LiFePO4 at or below 0°C (32°F) because lithium plating can occur and permanently reduce capacity. Use a BMS with low-temperature charge cutoff, warm the battery using insulation or heaters, or choose self-heating batteries for winter. Discharging below freezing is usually less risky than charging, but follow the battery’s datasheet.
Why charging below freezing is a hard stop
Below 0°C, the electrochemistry slows down. If you force charge current, metallic lithium can plate onto the anode. That damage is not “fixed” by a later warm charge. It often shows up as:
- Reduced usable capacity
- Higher voltage sag under load
- Increased heat at higher currents
- Earlier BMS cutoffs
The most practical protections (ranked by reliability)
- BMS low-temp charge cutoff (best default)
- Blocks charging when cells are too cold
- Many “drop-in” LiFePO4 packs include this feature
- You must verify it works (test in controlled conditions)
- Self-heating battery or heating pad
- Heat first, then allow charging
- Use a thermostat or controller
- Ensure wiring and fusing are correct and compliant
- Insulation + battery placement
- Put batteries inside conditioned space when possible
- Use insulated enclosures to slow temperature swings
- Avoid mounting packs directly to cold metal surfaces
- Charge scheduling
- In solar, charge later in the day when ambient rises
- In RV/marine, run a heater or cabin conditioning before charging
What to do in winter solar systems
A simple winter workflow that prevents mistakes:
- Morning: battery may be cold, so limit or block charging
- Midday: once battery temperature rises above 0°C, allow normal CC/CV
- Evening: avoid pushing to 100% unless you need it; consider a daily cap for lifespan
Field check: confirm your low-temp cutoff actually engages
You can validate without abusing the battery:
- Observe BMS app data (if available): cell temp and charge enable status
- Confirm the charger shows “no charge” or reduced current while cold
- Confirm charging resumes only after the battery warms above the cutoff
If you see charging current flowing at sub-zero temps, treat it as an urgent configuration or hardware issue.
Step-by-Step: How to Charge LiFePO4 Batteries Safely
On our commissioning bench, the safest systems are boring. They have correct series count, correct profile, short thick cables, and one clear termination rule.
To charge safely, verify the battery series count and BMS limits, program a LiFePO4 CC/CV profile with the correct absorption voltage and current limit, prevent voltage-drop errors with proper cabling or remote sense, connect with pre-charge for large banks, and confirm completion by tail current taper. Use an 80–90% daily cap for lifespan and perform occasional full charges for balancing.
Step 1: Identify the battery and confirm the “real” voltage system
Before you touch settings, confirm:
- Chemistry is truly LiFePO4 (LFP), not NMC/NCA or “lithium” generic
- Series count: 4S / 8S / 16S
- Battery capacity (Ah) and max recommended charge current
- BMS charge cutoff, discharge cutoff, and low-temp cutoff behavior
This is the part your Chinese note nails: Lithium iron phosphate chargers are different from lead-acid chargers.. If you treat it like lead-acid, your settings will be wrong.
Step 2: Choose the charging device and make it the single “boss”
Decide what will control the charge voltage:
- AC charger
- Inverter/charger
- MPPT
- DC-DC from alternator
Then disable or coordinate other charging sources. If two devices fight, you get weird cycling.
Step 3: Program the LiFePO4 CC/CV profile
Set:
- Absorption/CV voltage (by series count)
- Max charge current (A)
- Absorption time (short, if you terminate by tail current; longer if you cannot)
- Float: off, or low hold voltage if required
- Rebulk/restart: set so the system does not “micro-cycle” every few minutes
Practical “daily use” strategy:
- Set absorption slightly lower (daily cap) for routine cycling
- Schedule or trigger a full charge occasionally (for balancing or when you need full range)
Step 4: Fix wiring so the charger sees the true battery voltage
Voltage drop is silent sabotage. Your charger might be set perfectly, but the battery never sees the right voltage.
Use:
- Shorter cable runs where possible
- Thicker cable (lower resistance)
- Proper lugs, crimping, and torque
- Clean busbars and tight connections
- Remote voltage sense if the charger supports it (sense wires at battery terminals)
Here’s a simple “reality check” table using example scenarios:
| Charge current | One-way cable length (charger→battery) | Example cable choice | What can happen | Field fix |
|---|---|---|---|---|
| 30A | 2 m | Medium cable | Minor error; slower finish | Shorten run or increase gauge |
| 60A | 3 m | Medium cable | CV never truly reaches battery; chronic undercharge | Increase gauge + remote sense |
| 100A | 3–5 m | Undersized cable | Heat, voltage sag, BMS trips | Rewire with larger cable + proper protection |
| 150A+ | 5 m+ | Any marginal cable | Charger “lies,” connectors heat, safety risk | Redesign: busbars, sense leads, shorter runs |
If you want a quick measurement method:
- Measure voltage at charger output studs
- Measure voltage at battery terminals
- The difference under load is your drop. If it’s significant, fix wiring before chasing settings.
Step 5: Add protection and safe connection practice (especially for large banks)
Minimum safety items (check local codes/regs for specifics):
- Proper fuse or breaker near the battery
- Correct disconnect switch rating
- Correct polarity checks
- Grounding and bonding per applicable standards
- Cable strain relief and abrasion protection
For large banks and big inverters/chargers:
- Use a pre-charge resistor or soft-start path
- Connect pre-charge first, wait for capacitors to charge, then close the main contactor/disconnect
This prevents:
- Arcing
- Nuisance BMS trips
- Blown fuses from capacitor inrush
Step 6: Charge and verify “full” correctly
During charging, watch:
- CC stage current (should be near your limit)
- Battery temperature (especially in cold environments)
- Transition to CV (voltage holds steady, current begins to taper)
- Tail current at the end (your “full” confirmation)
A clean end-of-charge checklist:
- Voltage is stable at absorption setpoint
- Current tapered to tail current (example ~0.05C)
- No excessive heating at cables, lugs, or charger
- BMS does not trip
Step 7: Use a daily charge cap for longer lifespan
If your goal is longevity, not maximum runtime every single day:
- Set absorption slightly lower, or stop early
- Target roughly 80–90% SOC for daily cycling
- Run an occasional full charge (100%) when needed for balancing or long trips
This reduces time spent near the very top of charge, which generally helps cycle life.
Common LiFePO4 Charging Mistakes and FAQs (BMS, Balancing, Storage)
In our RMA notes, the most common “battery problem” is actually a settings problem. Fix the profile and the battery looks “new” again.
Most LiFePO4 charging issues come from using the wrong charger profile, charging in freezing temperatures, ignoring voltage drop, or misunderstanding the BMS. The BMS protects cells and may balance near the top of charge, so occasional full charges can help. For storage, keep a moderate state of charge and avoid leaving the pack at high voltage for long periods.
Mistake 1: Using a lead-acid profile (or leaving equalize/desulfation on)
Symptoms:
- Battery never seems to reach full capacity
- Random BMS cutoffs
- Charger cycles oddly between stages
Fix:
- Switch to LiFePO4 CC/CV profile
- Disable equalize/desulfation
- Reduce or disable float
Mistake 2: Charging at or below 0°C
Symptoms:
- Battery “charges,” but capacity drops over time
- BMS behaves inconsistently in winter
- Higher voltage sag under load later
Fix:
- Enable BMS low-temp cutoff
- Warm the pack before charging
- Move batteries to conditioned space if possible
Mistake 3: Wrong voltage because the series count is wrong
Symptoms:
- “12V” pack charges fast but dies early
- Charger never reaches CV
- BMS trips on overvoltage unexpectedly
Fix:
- Confirm series count (4S/8S/16S)
- Set absorption correctly by per-cell targets
Mistake 4: Thinking “full” happens the moment voltage hits the target
Symptoms:
- Top balancing never seems to happen
- Battery hits voltage then drops quickly under load
- SOC meters drift
Fix:
- Use tail current to confirm full
- Allow occasional full charges to support balancing
Mistake 5: Ignoring cable voltage drop
Symptoms:
- Charger shows 14.6V, but battery is still not full
- CV stage takes forever
- Cables or lugs run warm
Fix:
- Shorten cable runs
- Increase gauge
- Use remote sense if supported
- Verify connection torque and lug quality
Mistake 6: Alternator charging with an isolator instead of DC-DC
Symptoms:
- Alternator runs hot
- Battery draws huge current for long periods
- BMS trips, or alternator voltage becomes unstable
Fix:
- Install a DC-DC charger sized for alternator capacity and battery limits
- Set proper CC/CV voltage and current
Storage guidance (simple and safe)
For most LiFePO4 packs:
- Store at a moderate SOC (often around 40–60% as a general practice)
- Avoid leaving the pack at 100% for long storage periods
- Avoid storage in extreme heat
- If the system has parasitic loads, disconnect or use a maintenance plan
If the battery has a BMS with quiescent draw, long storage can still drain it. Plan a periodic check and top-up as needed.
Quick troubleshooting table: symptom → likely cause → fix
| Symptom | Likely cause | Practical fix |
|---|---|---|
| “Never reaches full” | Voltage drop or too-short CV time | Thicker/shorter cables, remote sense, allow taper to tail current |
| “BMS trips near end” | Absorption too high, charger spikes, or equalize on | Lower absorption, disable equalize, verify charger stability |
| “Charges fine but low runtime” | Stopping at voltage, no taper time | Terminate by tail current; verify capacity and loads |
| “Winter charging won’t start” | Low-temp cutoff active (good) | Warm battery above 0°C; add insulation/heater |
| “Alternator gets hot” | No current limiting | Use DC-DC charger; reduce charge current |
FAQ
1) Can I charge LiFePO4 with a lead-acid charger in an emergency?
Sometimes it will “work,” but it is risky and often undercharges. Lead-acid profiles can include float and equalize behaviors that do not match LiFePO4. If you must, disable equalize and keep voltages conservative, then replace with a proper LiFePO4 profile ASAP.
2) What voltage should a 12V LiFePO4 battery be charged to?
Most 12V LiFePO4 packs are 4S, so absorption is commonly around 14.4–14.6V (about 3.60–3.65V per cell). Use your battery maker’s recommended values if available, because BMS limits can differ.
3) How do I know when LiFePO4 is fully charged?
Watch the CV stage. The battery is “full” when current tapers down to a small tail current (often around 5% of capacity as a practical rule), not the moment voltage first reaches the setpoint.
4) Do LiFePO4 batteries need float charging?
Usually no. Continuous float is a lead-acid habit. If your equipment forces a float setting, keep it low (around 3.40V per cell) or configure it as a restart threshold rather than a constant hold.
5) Can I charge LiFePO4 below freezing if I use a small current?
It is still not recommended. Charging at or below 0°C increases lithium plating risk. Use a BMS low-temp cutoff and warm the battery before charging.
6) Why does my BMS stop charging before the charger finishes?
Common causes are absorption voltage too high, charger voltage overshoot, cable voltage drop confusing regulation, or cell imbalance. Verify settings, wiring, and whether the BMS is protecting a single high cell.
7) Do I need to fully charge for balancing?
Often yes. Many BMS balancers work near the top of charge. An initial full charge and occasional full charges can help cells equalize and reduce early cutoffs.
8) Is it better to charge to 80% or 100% daily?
For longer lifespan, many users set a daily cap around 80–90% and only charge to 100% when needed. The best point depends on your runtime needs and whether the pack needs periodic full charges for balancing.
9) Can I charge a LiFePO4 bank directly from an alternator?
Direct alternator charging through an isolator is risky because LiFePO4 can demand high current continuously. A DC-DC charger is the safer standard because it limits current and enforces the proper CC/CV profile.
10) What is pre-charge and when do I need it?
Pre-charge is a controlled way to fill inverter/charger capacitors before closing the main connection. You need it on larger banks and high-power inverters to prevent arcing, blown fuses, and nuisance BMS trips from inrush current.
Conclusion
Set a true LiFePO4 CC/CV profile, confirm series count and temperature limits, and verify “full” by tail current. Then fix voltage drop and add DC-DC/pre-charge where needed for reliable, long-life systems.