

Зарядка литий-железо-фосфатного аккумулятора: пошаговая инструкция
Я вижу, что на наш контрольный стенд возвращают аккумуляторные батареи по одной простой причине: зарядное устройство настроено как для свинцово-кислотных батарей. Эта ошибка приводит к малому времени работы, ложным срабатываниям BMS или перегрузке элементов питания.
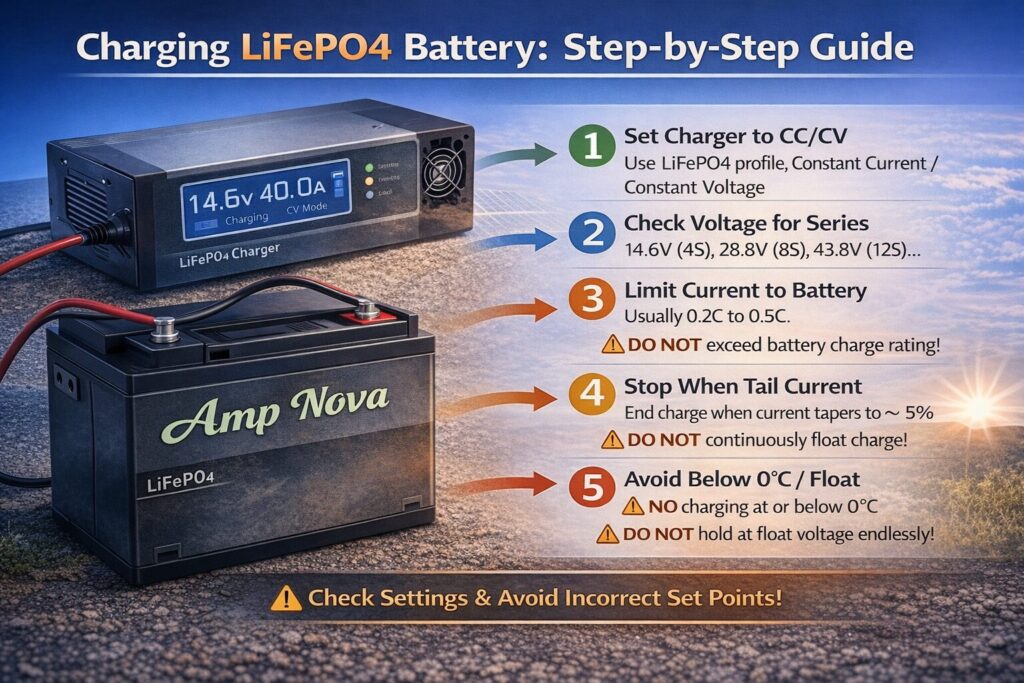
Для безопасной зарядки литий-железо-фосфатного аккумулятора используйте профиль CC/CV для литий-железо-фосфатных аккумуляторов, установите правильное напряжение в зависимости от количества последовательно соединенных элементов, ограничьте зарядный ток номинальным значением аккумулятора и прекратите зарядку, когда ток начнет уменьшаться. Избегайте зарядки при температуре 0°C и ниже, а также избегайте непрерывной поддерживающей зарядки.
В этом руководстве я покажу, какие именно настройки нужно проверить, чего следует избегать, а также предложу практический пошаговый процесс, которому вы можете следовать на реальных солнечных батареях, в автодомах, на морских судах и в системах резервного электропитания.
Понимание основ зарядки LiFePO4 (объяснение CC/CV)
На нашем испытательном стенде самый быстрый способ выявить неправильную настройку — это анализ кривой тока. Для LiFePO4 требуется стабильный ток, а затем плавное снижение, а не бесконечный «плавающий» ток.
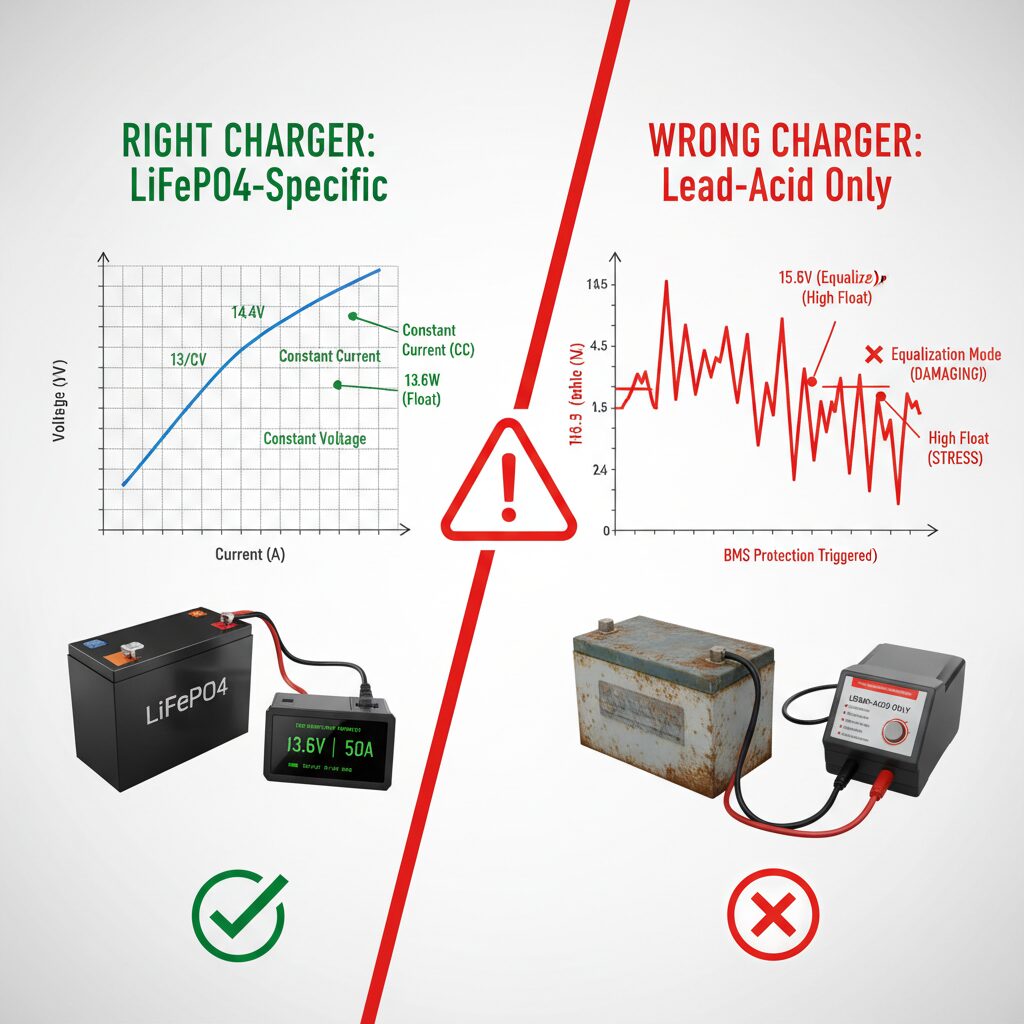
Зарядка LiFePO4 обычно осуществляется в режиме постоянного тока (CC/CV): зарядное устройство подает постоянный ток (CC) до тех пор, пока батарея не достигнет заданного напряжения, а затем поддерживает постоянное напряжение (CV), пока ток не начнет снижаться. Батарея LiFePO4 считается «полностью заряженной», когда ток CV падает до небольшого остаточного тока, а не просто когда достигается целевое напряжение.
Почему зарядка LiFePO4 ощущается «по-другому», чем зарядка свинцово-кислотных аккумуляторов
У литий-железо-фосфатного аккумулятора более пологая вольт-амперная характеристика на большей части диапазона заряда. Это означает:
- Одного лишь напряжения недостаточно, чтобы считаться "индикатором уровня топлива".
- Многоступенчатая логика зарядного устройства для свинцово-кислотных аккумуляторов (основной заряд/поглощение/поддержание заряда, иногда выравнивание) может быть неподходящей.
- Традиционный режим поддержания заряда часто не требуется для LiFePO4 и может увеличить время работы при высоком напряжении.
В профилях свинцово-кислотных аккумуляторов также могут присутствовать импульсы «выравнивания» или «десульфатации». Эти этапы не предназначены для литий-железо-фосфатных аккумуляторов. В полевых условиях это проявляется в виде отключения системы управления батареей (BMS), перегрева и нестабильной работы аккумуляторных блоков.
Сначала CC, затем CV, и почему важен «хвостовой ток».
Представьте, что составление резюме/сопроводительного письма — это наполнение ведра:
- Стадия рака шейки матки: Вы наливаете жидкость с постоянной скоростью (в амперах). Напряжение батареи повышается.
- Этап CV: Вы поддерживаете уровень воды на фиксированной высоте (напряжение). Скорость наливания естественным образом замедляется (амперы уменьшаются).
Литий-железо-фосфатный аккумулятор считается «полностью заряженным», когда ток в цепи CV падает до небольшого значения. Общепринятое практическое правило таково: Ток в хвостовой части составляет около ~5% емкости. (например: батарея емкостью 100 Ач считается «полностью заряженной», когда ток CV падает до ~5 А), но если характеристики батареи отличаются, всегда следует руководствоваться техническими характеристиками производителя.
Это важно, потому что:
- Если остановить процесс в тот момент, когда напряжение достигнет заданного значения, можно остановиться раньше.
- Если постоянно подавать высокое напряжение без правил оконечного сопротивления, вы тратите время впустую и можете перегрузить аккумуляторную батарею.
Какое устройство фактически управляет процессом?
В солнечных и гибридных системах «зарядным устройством» может быть:
- Автономное зарядное устройство переменного тока
- Инвертор/зарядное устройство
- MPPT-контроллер заряда
- DC-DC зарядное устройство от генератора переменного тока
У вас только один настоящий босс. Если несколько устройств пытаются регулировать напряжение одновременно, могут возникнуть скачки напряжения, преждевременное отключение или многократные перезагрузки. Выбирайте один основной источник зарядки за раз или согласуйте настройки так, чтобы они совпадали.
Краткий справочник: этапы CC/CV и что нужно установить.
| Этап | Что происходит | То, что вы устанавливаете | Когда остановиться |
|---|---|---|---|
| CC (постоянный ток) | Ток остается близким к пределу; напряжение повышается. | Максимальный зарядный ток (А) | Когда аккумуляторная батарея достигает напряжения поглощения |
| CV (постоянное напряжение) | Напряжение поддерживается постоянным; ток уменьшается. | Напряжение поглощения/циклической вольтамперометрии (В) | Когда ток падает до значения, соответствующего остаточному току, или таймер завершается, |
| Отдых (по желанию) | Зарядка прекращается; аккумуляторная батарея разряжается | Никто | При необходимости используйте пороговое значение перезапуска. |
| Плавать (как правило, избегать) | Поддерживает напряжение батареи на фиксированном уровне. | Низкий уровень плавучести или инвалидность | При необходимости поддерживайте низкий уровень шума, но не постоянно. |
Выбор подходящего зарядного устройства для LiFePO4 (чего следует избегать)
В ходе проверок производственных линий большинство «загадочных проблем» сводятся к одному решению о покупке: зарядное устройство, которое невозможно правильно запрограммировать, поэтому люди принудительно устанавливают профиль разряда свинцово-кислотного аккумулятора.
Выберите зарядное устройство, специально предназначенное для LiFePO4, или программируемый инвертор/MPPT-контроллер, поддерживающий режимы CC/CV и позволяющий точно устанавливать напряжение и ток. Избегайте зарядных устройств, предназначенных только для свинцово-кислотных аккумуляторов, режимов выравнивания/десульфатации и высоких поддерживающих напряжений, поскольку они могут привести к недозаряду батареи, срабатыванию защиты BMS или поддержанию высокого напряжения на аккумуляторе.
Обязательные функции для зарядное устройство для LiFePO4
Искать:
- Профиль LiFePO4/литий или полностью программируемый Настройки CC/CV
- Регулируемый предел тока (или несколько режимов тока)
- Четкое завершение процесса (ток хвоста, таймер или и то, и другое)
- температурный контроль (Идеальный вариант — вход от датчика температуры батареи)
- Меры безопасности: обратная полярность, короткое замыкание, перегрев
- Электротехническое соответствие подходит для вашего региона (всегда проверяйте местные нормы и правила установки и электромонтажа).
Если вы используете инвертор/зарядное устройство или MPPT-контроллер, убедитесь, что он поддерживает профиль для литиевых батарей, в котором можно установить следующие параметры:
- Напряжение объемного/абсорбционного поглощения (CV)
- Время поглощения (или время прекращения подачи тока)
- Напряжение плавающего заряда (в идеале — выключено или очень низкое)
- Пороги перезапуска/повторной обработки
Чего следует избегать (этот список поможет сэкономить заряд батареи)
Избегайте зарядных устройств, которые:
- Иметь только свинцово-кислотные Предустановленные режимы (AGM/GEL/жидкий электролит) без возможности истинной настройки литиевых аккумуляторов.
- Включать уравнять или десульфатация который нельзя отключить
- Принудить высокая плавучесть стадия на неопределенный срок
- Нет возможности ограничить ток (опасно для небольших аккумуляторных батарей и вредно для генераторов).
- Технические характеристики расплывчаты, например, "литий-ионный аккумулятор на 12 В", но отсутствует регулировка напряжения.
Для зарядки от автомобильного генератора используйте преобразователь постоянного тока (DC-DC), а не простой изолятор.
Генераторы переменного тока не являются зарядными устройствами для аккумуляторов. При подключении большого литий-железо-фосфатного аккумулятора через изолятор, батарея может потреблять большой ток в течение длительного времени. Это может привести к:
- Перегрев генератора (длительная работа на высокой мощности)
- Создание нестабильной стабилизации напряжения
- Срабатывание защиты BMS батареи (от перегрузки по току или перенапряжения)
А DC-DC зарядное устройство решает эту проблему путем обеспечения соблюдения следующих правил:
- Максимальное потребление тока от генератора.
- Правильный профиль литиевой батареи CC/CV
- Часто используются системы контроля воспламенения и защиты от перегрева.
При разработке мобильных систем рассматривайте преобразователи постоянного тока в постоянный как стандартную практику, а не как дополнительную опцию.
Когда следует обращать внимание на дистанционное измерение напряжения
Более качественные зарядные устройства поддерживают дистанционное измерение напряженияЭто означает, что зарядное устройство измеряет напряжение на клеммах аккумулятора, а не на выходных контактах зарядного устройства. Это важно, потому что падение напряжения в кабеле может «обмануть» зарядное устройство.
Если ваши кабели длинные или ток высокий, дистанционное измерение может сыграть решающую роль в следующем:
- Полная зарядка и хронический недозаряд
- Стабильное снижение CV-параметров и бесконечная стадия поглощения.
Inrush и почему крупным банкам необходима бережная связь.
Крупные инверторы и зарядные устройства часто имеют большие входные конденсаторы. При подключении литий-железо-фосфатной батареи эти конденсаторы могут кратковременно, но значительно увеличить ток. пусковой ток что вызывает:
- Искрение в разъеме
- Нежелательные срабатывания BMS
- Перегоревшие предохранители
А резистор предварительной зарядки или плавный пуск Этот путь снижает ударную нагрузку. Если ваша система рассчитана на 24 В/48 В и обладает высокой мощностью, с самого начала следует предусмотреть контроль пускового тока.
Настройка правильного напряжения и тока зарядки (12 В/24 В/48 В)
На нашем стенде для сортировки ячеек самый быстрый способ создать дисбаланс — это несоответствие целевых значений напряжения. Если количество ячеек в серии неправильное, то и все остальные настройки тоже окажутся неправильными.
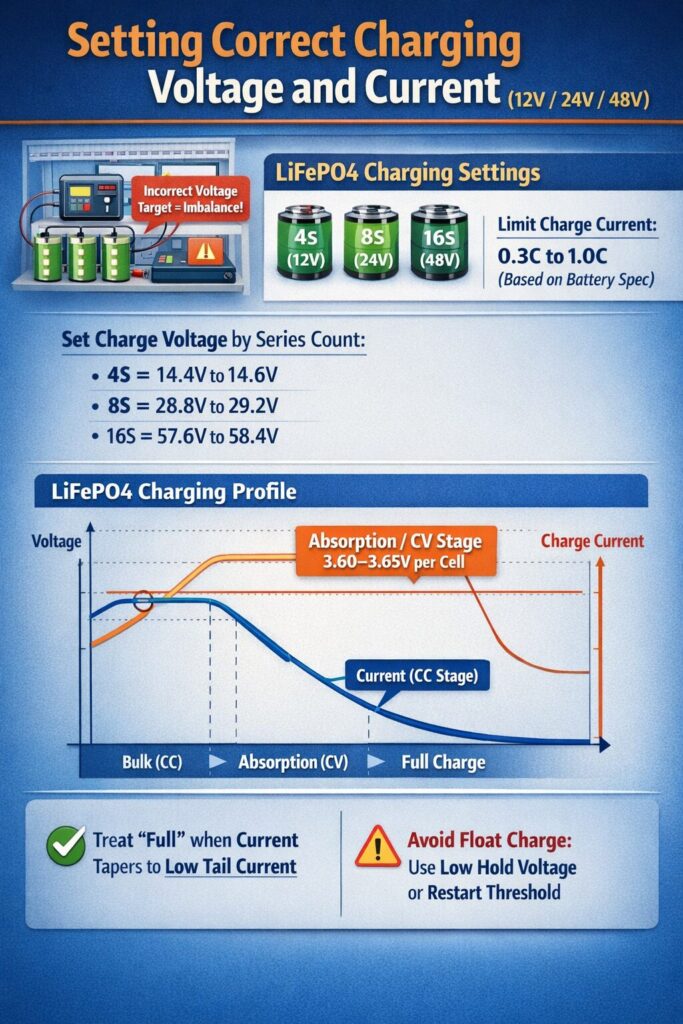
Установите напряжение заряда LiFePO4 в зависимости от количества последовательно соединенных ячеек, обычно около 3,60–3,65 В на ячейку для абсорбционного заряда/CV. Ограничьте зарядный ток до значений, указанных в спецификации батареи (часто около 0,3–1,0C), и считайте «полным» точку, где ток CV уменьшается до небольшого остаточного тока. Избегайте традиционного режима поддержания заряда; при необходимости используйте низкое напряжение удержания или порог перезапуска.
Шаг 1: Подтвердите количество упаковок (S)
Общепринятые «системные напряжения» — это, по сути, сокращенное обозначение количества последовательно соединенных элементов:
- «12V LiFePO4» обычно 4S (4 cells in series)
- “24V LiFePO4” is usually 8S
- “48V LiFePO4” is usually 16S
Do not assume. Verify the label, datasheet, or BMS configuration. A “12V” pack that is actually 8S (rare, but not impossible in custom builds) will not charge correctly on 14.6V.
Step 2: Set absorption/CV voltage using per-cell guidance
A practical typical range is:
- Absorption/CV: ~3.60–3.65V per cell
- Low float / hold (if you must): ~3.40V per cell or disable float
- Daily charge cap: often 80–90% SOC by slightly reducing absorption voltage or stopping early
Here are typical pack-level examples:
| System label | Cells in series | Absorption/CV (typical) | Daily-cap target (often 80–90% SOC)* | Low float / restart hold (if required) |
|---|---|---|---|---|
| 12V LiFePO4 | 4S | ~14.4–14.6V | ~13.8–14.2V | ~13.6V (or float off) |
| 24V LiFePO4 | 8S | ~28.8–29.2V | ~27.6–28.4V | ~27.2V (or float off) |
| 48V LiFePO4 | 16S | ~57.6–58.4V | ~55.2–56.8V | ~54.4V (or float off) |
*Daily-cap values are general guidance. Different cell vendors and BMS limits can shift the “best” voltage. Use the battery manufacturer’s recommended settings when available.
Step 3: Set charge current using C-rate (and your system reality)
C-rate converts battery capacity to current:
- Charge current (A) = Capacity (Ah) × C-rate
Examples:
- 100Ah at 0.5C = 50A
- 280Ah at 0.3C = 84A
- 200Ah at 1.0C = 200A (only if the battery is rated for it and the wiring/protection supports it)
Many LiFePO4 batteries support something in the 0.3–1.0C range, but you must follow the pack’s rating, because:
- BMS overcurrent limits vary
- Thermal design varies
- Small “drop-in” packs often have lower continuous limits than big rack modules
Also check system constraints:
- Cable ampacity
- Fuse/breaker ratings
- Charger output rating
- Alternator safe draw (for mobile)
Step 4: Terminate the charge by tail current, not only by voltage
A clean rule that works in practice:
- Hold CV at absorption voltage
- Stop when current drops to a tail current (example: ~0.05C, or 5% of capacity)
- Or stop based on a safe absorb timer if your charger cannot terminate by tail current
Why this prevents headaches:
- It avoids “false full” when voltage is reached briefly.
- It reduces time spent forcing a high voltage when the battery is already essentially full.
- It supports BMS balancing, because balancing often happens near the top.
Step 5: Avoid continuous float (and what to do if your device forces it)
LiFePO4 does not need a classic lead-acid float. If your charger requires a float setting:
- Set it low (around 3.40V/cell, e.g., 13.6V for 4S)
- Or treat float as a restart threshold concept (stop charging, restart if voltage falls)
If your inverter/charger insists on constant float at a high voltage, consider changing equipment or using a different charging mode, because that design assumption is lead-acid thinking.
Рекомендации по температуре зарядки (советы по зарядке в холодную погоду)
In our failure analysis photos, cold-charge damage looks boring at first and expensive later. The pack “works,” but capacity and internal resistance drift the wrong way.
Never charge LiFePO4 at or below 0°C (32°F) because lithium plating can occur and permanently reduce capacity. Use a BMS with low-temperature charge cutoff, warm the battery using insulation or heaters, or choose self-heating batteries for winter. Discharging below freezing is usually less risky than charging, but follow the battery’s datasheet.
Why charging below freezing is a hard stop
Below 0°C, the electrochemistry slows down. If you force charge current, metallic lithium can plate onto the anode. That damage is not “fixed” by a later warm charge. It often shows up as:
- Reduced usable capacity
- Higher voltage sag under load
- Increased heat at higher currents
- Earlier BMS cutoffs
The most practical protections (ranked by reliability)
- BMS low-temp charge cutoff (best default)
- Blocks charging when cells are too cold
- Many “drop-in” LiFePO4 packs include this feature
- You must verify it works (test in controlled conditions)
- Self-heating battery or heating pad
- Heat first, then allow charging
- Use a thermostat or controller
- Ensure wiring and fusing are correct and compliant
- Insulation + battery placement
- Put batteries inside conditioned space when possible
- Use insulated enclosures to slow temperature swings
- Avoid mounting packs directly to cold metal surfaces
- Charge scheduling
- In solar, charge later in the day when ambient rises
- In RV/marine, run a heater or cabin conditioning before charging
What to do in winter solar systems
A simple winter workflow that prevents mistakes:
- Morning: battery may be cold, so limit or block charging
- Midday: once battery temperature rises above 0°C, allow normal CC/CV
- Evening: avoid pushing to 100% unless you need it; consider a daily cap for lifespan
Field check: confirm your low-temp cutoff actually engages
You can validate without abusing the battery:
- Observe BMS app data (if available): cell temp and charge enable status
- Confirm the charger shows “no charge” or reduced current while cold
- Confirm charging resumes only after the battery warms above the cutoff
If you see charging current flowing at sub-zero temps, treat it as an urgent configuration or hardware issue.
Пошаговая инструкция: Как безопасно заряжать литий-железо-фосфатные (LiFePO4) батареи
On our commissioning bench, the safest systems are boring. They have correct series count, correct profile, short thick cables, and one clear termination rule.
To charge safely, verify the battery series count and BMS limits, program a LiFePO4 CC/CV profile with the correct absorption voltage and current limit, prevent voltage-drop errors with proper cabling or remote sense, connect with pre-charge for large banks, and confirm completion by tail current taper. Use an 80–90% daily cap for lifespan and perform occasional full charges for balancing.
Step 1: Identify the battery and confirm the “real” voltage system
Before you touch settings, confirm:
- Chemistry is truly LiFePO4 (LFP), not NMC/NCA or “lithium” generic
- Series count: 4S / 8S / 16S
- Battery capacity (Ah) and max recommended charge current
- BMS charge cutoff, discharge cutoff, and low-temp cutoff behavior
This is the part your Chinese note nails: Lithium iron phosphate chargers are different from lead-acid chargers.. If you treat it like lead-acid, your settings will be wrong.
Step 2: Choose the charging device and make it the single “boss”
Decide what will control the charge voltage:
- AC charger
- Inverter/charger
- MPPT
- DC-DC from alternator
Then disable or coordinate other charging sources. If two devices fight, you get weird cycling.
Step 3: Program the LiFePO4 CC/CV profile
Set:
- Absorption/CV voltage (by series count)
- Max charge current (A)
- Absorption time (short, if you terminate by tail current; longer if you cannot)
- Float: off, or low hold voltage if required
- Rebulk/restart: set so the system does not “micro-cycle” every few minutes
Practical “daily use” strategy:
- Set absorption slightly lower (daily cap) for routine cycling
- Schedule or trigger a full charge occasionally (for balancing or when you need full range)
Step 4: Fix wiring so the charger sees the true battery voltage
Voltage drop is silent sabotage. Your charger might be set perfectly, but the battery never sees the right voltage.
Use:
- Shorter cable runs where possible
- Thicker cable (lower resistance)
- Proper lugs, crimping, and torque
- Clean busbars and tight connections
- Remote voltage sense if the charger supports it (sense wires at battery terminals)
Here’s a simple “reality check” table using example scenarios:
| Charge current | One-way cable length (charger→battery) | Example cable choice | What can happen | Field fix |
|---|---|---|---|---|
| 30A | 2 m | Medium cable | Minor error; slower finish | Shorten run or increase gauge |
| 60A | 3 m | Medium cable | CV never truly reaches battery; chronic undercharge | Increase gauge + remote sense |
| 100А | 3–5 m | Undersized cable | Heat, voltage sag, BMS trips | Rewire with larger cable + proper protection |
| 150A+ | 5 m+ | Any marginal cable | Charger “lies,” connectors heat, safety risk | Redesign: busbars, sense leads, shorter runs |
If you want a quick measurement method:
- Measure voltage at charger output studs
- Measure voltage at battery terminals
- The difference under load is your drop. If it’s significant, fix wiring before chasing settings.
Step 5: Add protection and safe connection practice (especially for large banks)
Minimum safety items (check local codes/regs for specifics):
- Proper fuse or breaker near the battery
- Correct disconnect switch rating
- Correct polarity checks
- Grounding and bonding per applicable standards
- Cable strain relief and abrasion protection
For large banks and big inverters/chargers:
- Use a резистор предварительной зарядки или плавный пуск path
- Connect pre-charge first, wait for capacitors to charge, then close the main contactor/disconnect
This prevents:
- Arcing
- Нежелательные срабатывания BMS
- Blown fuses from capacitor inrush
Step 6: Charge and verify “full” correctly
During charging, watch:
- CC stage current (should be near your limit)
- Battery temperature (especially in cold environments)
- Transition to CV (voltage holds steady, current begins to taper)
- Tail current at the end (your “full” confirmation)
A clean end-of-charge checklist:
- Voltage is stable at absorption setpoint
- Current tapered to tail current (example ~0.05C)
- No excessive heating at cables, lugs, or charger
- BMS does not trip
Step 7: Use a daily charge cap for longer lifespan
If your goal is longevity, not maximum runtime every single day:
- Set absorption slightly lower, or stop early
- Target roughly 80–90% SOC for daily cycling
- Run an occasional full charge (100%) when needed for balancing or long trips
This reduces time spent near the very top of charge, which generally helps cycle life.
Распространенные ошибки при зарядке LiFePO4 и часто задаваемые вопросы (BMS, балансировка, хранение)
In our RMA notes, the most common “battery problem” is actually a settings problem. Fix the profile and the battery looks “new” again.
Most LiFePO4 charging issues come from using the wrong charger profile, charging in freezing temperatures, ignoring voltage drop, or misunderstanding the BMS. The BMS protects cells and may balance near the top of charge, so occasional full charges can help. For storage, keep a moderate state of charge and avoid leaving the pack at high voltage for long periods.
Mistake 1: Using a lead-acid profile (or leaving equalize/desulfation on)
Symptoms:
- Battery never seems to reach full capacity
- Random BMS cutoffs
- Charger cycles oddly between stages
Fix:
- Switch to LiFePO4 CC/CV profile
- Disable equalize/desulfation
- Reduce or disable float
Mistake 2: Charging at or below 0°C
Symptoms:
- Battery “charges,” but capacity drops over time
- BMS behaves inconsistently in winter
- Higher voltage sag under load later
Fix:
- Enable BMS low-temp cutoff
- Warm the pack before charging
- Move batteries to conditioned space if possible
Mistake 3: Wrong voltage because the series count is wrong
Symptoms:
- “12V” pack charges fast but dies early
- Charger never reaches CV
- BMS trips on overvoltage unexpectedly
Fix:
- Confirm series count (4S/8S/16S)
- Set absorption correctly by per-cell targets
Mistake 4: Thinking “full” happens the moment voltage hits the target
Symptoms:
- Top balancing never seems to happen
- Battery hits voltage then drops quickly under load
- SOC meters drift
Fix:
- Use tail current to confirm full
- Allow occasional full charges to support balancing
Mistake 5: Ignoring cable voltage drop
Symptoms:
- Charger shows 14.6V, but battery is still not full
- CV stage takes forever
- Cables or lugs run warm
Fix:
- Shorten cable runs
- Increase gauge
- Use remote sense if supported
- Verify connection torque and lug quality
Mistake 6: Alternator charging with an isolator instead of DC-DC
Symptoms:
- Alternator runs hot
- Battery draws huge current for long periods
- BMS trips, or alternator voltage becomes unstable
Fix:
- Install a DC-DC charger sized for alternator capacity and battery limits
- Set proper CC/CV voltage and current
Storage guidance (simple and safe)
For most LiFePO4 packs:
- Store at a moderate SOC (often around 40–60% as a general practice)
- Avoid leaving the pack at 100% for long storage periods
- Avoid storage in extreme heat
- If the system has parasitic loads, disconnect or use a maintenance plan
If the battery has a BMS with quiescent draw, long storage can still drain it. Plan a periodic check and top-up as needed.
Quick troubleshooting table: symptom → likely cause → fix
| Symptom | Likely cause | Practical fix |
|---|---|---|
| “Never reaches full” | Voltage drop or too-short CV time | Thicker/shorter cables, remote sense, allow taper to tail current |
| “BMS trips near end” | Absorption too high, charger spikes, or equalize on | Lower absorption, disable equalize, verify charger stability |
| “Charges fine but low runtime” | Stopping at voltage, no taper time | Terminate by tail current; verify capacity and loads |
| “Winter charging won’t start” | Low-temp cutoff active (good) | Warm battery above 0°C; add insulation/heater |
| “Alternator gets hot” | No current limiting | Use DC-DC charger; reduce charge current |
Часто задаваемые вопросы
1) Can I charge LiFePO4 with a lead-acid charger in an emergency?
Sometimes it will “work,” but it is risky and often undercharges. Lead-acid profiles can include float and equalize behaviors that do not match LiFePO4. If you must, disable equalize and keep voltages conservative, then replace with a proper LiFePO4 profile ASAP.
2) What voltage should a 12V LiFePO4 battery be charged to?
Most 12V LiFePO4 packs are 4S, so absorption is commonly around 14.4–14.6V (about 3.60–3.65V per cell). Use your battery maker’s recommended values if available, because BMS limits can differ.
3) How do I know when LiFePO4 is fully charged?
Watch the CV stage. The battery is “full” when current tapers down to a small tail current (often around 5% of capacity as a practical rule), not the moment voltage first reaches the setpoint.
4) Do LiFePO4 batteries need float charging?
Usually no. Continuous float is a lead-acid habit. If your equipment forces a float setting, keep it low (around 3.40V per cell) or configure it as a restart threshold rather than a constant hold.
5) Can I charge LiFePO4 below freezing if I use a small current?
It is still not recommended. Charging at or below 0°C increases lithium plating risk. Use a BMS low-temp cutoff and warm the battery before charging.
6) Why does my BMS stop charging before the charger finishes?
Common causes are absorption voltage too high, charger voltage overshoot, cable voltage drop confusing regulation, or cell imbalance. Verify settings, wiring, and whether the BMS is protecting a single high cell.
7) Do I need to fully charge for balancing?
Often yes. Many BMS balancers work near the top of charge. An initial full charge and occasional full charges can help cells equalize and reduce early cutoffs.
8) Is it better to charge to 80% or 100% daily?
For longer lifespan, many users set a daily cap around 80–90% and only charge to 100% when needed. The best point depends on your runtime needs and whether the pack needs periodic full charges for balancing.
9) Can I charge a LiFePO4 bank directly from an alternator?
Direct alternator charging through an isolator is risky because LiFePO4 can demand high current continuously. A DC-DC charger is the safer standard because it limits current and enforces the proper CC/CV profile.
10) What is pre-charge and when do I need it?
Pre-charge is a controlled way to fill inverter/charger capacitors before closing the main connection. You need it on larger banks and high-power inverters to prevent arcing, blown fuses, and nuisance BMS trips from inrush current.
Заключение
Set a true LiFePO4 CC/CV profile, confirm series count and temperature limits, and verify “full” by tail current. Then fix voltage drop and add DC-DC/pre-charge where needed for reliable, long-life systems.